Are you looking to add some greenery and charm to your outdoor space? Hanging planter boxes are a great way to beautify your deck, fence, or porch railing. In this guide, we will provide you with detailed instructions on how to properly install these planter boxes. Before we begin, remember that it’s crucial to assess the strength of your railing and seek professional assistance if needed to ensure your safety.
Key Takeaways
Tools Needed
To get started, gather the following tools:
- Drill
- 5/32” drill bit
- Wrench
- Phillips head screwdriver
- Pencil
- PVC plumbers cement/glue
Installation Steps
Follow these steps for a successful installation:
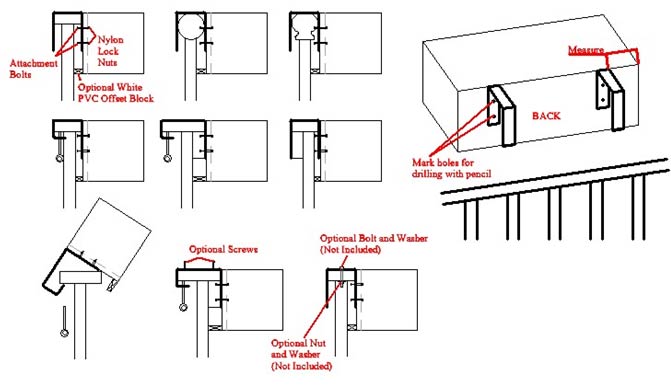
- Hold the hook in the desired position on the back of the box. Use a pencil to trace two dots onto the back of the box, indicating the installation holes.
- Use a 5/32” drill bit to predrill the two holes, allowing for the attachment bolts to be inserted.
- Attach the hook to the back of the box, placing one washer on the outside and tightening the hexagonal nut on the inside of the box using a wrench and screwdriver.
- Once all hooks are attached to the back of the box, simply hook the planter over the corresponding railing.
- For additional safety measures, consider drilling optional screws/bolts through the top of the hook and railing to secure it from falling. This is especially recommended for two-story buildings.
- To prevent the planter from leaning forward, you can use the provided PVC offset block, which can be glued to the back of the box.
Installing Rail Top Planters
If you prefer planter boxes that sit on top of the railing, follow these steps:
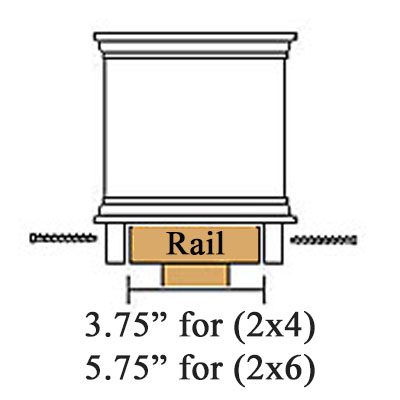
- Place the rail top planter on the railing to ensure a proper fit and identify any potential obstacles. The top surface of the railing should be flat, and the under strips of the planter should straddle each side of the railing.
- Use screws to attach the rail top planter to the railing. Mounting through the base of the planter generally requires 1-2 screws along the center, while mounting through the under strips usually requires 1-2 screws along each side.
Painting Your Planter Boxes
To add your personal touch and protect the planter boxes, you can paint them using the following instructions:
- Use any exterior latex paint of your choice. No priming is necessary, as the composite PVC readily accepts exterior latex paint.
- We recommend Sherwin-Williams Pro Industrial Multi-Surface Acrylic Exterior Latex Paint in an eggshell finish for its fast cure times and excellent adhesion.
- Paint directly on the planter box using a brush or roller. Do not paint the inside of the box, as you will be planting directly inside it. Alternatively, you can paint up to an inch below the dirt line.
- Avoid painting in direct sunlight or on a surface that is too warm to prevent heat blistering. Ensure the temperature is above 55 degrees Fahrenheit during painting.
- Remove any water and dirt from the PVC surface before painting to prevent moisture blistering.
- Use only 100% acrylic exterior latex paint; avoid oil-based paint and spray paints.
- Allow the paint to dry completely before filling the planter box with potting mix. Store the boxes in a covered garage for 2-4 days to ensure proper drying.
Planting in Your Planter Boxes
Once your planter boxes are installed and painted, it’s time to bring them to life with beautiful flowers or plants. Follow these planting instructions:
- Optional: You can use a self-watering reservoir, rocks, pebbles, or Styrofoam peanuts as a lightweight material.
- Optional: If you prefer, you can use black landscape fabric as a filter. Cut a slightly larger strip than the inside bottom of the box and place it first to prevent potting mix from spilling through the drain holes.
- Alternatively, you can use small rocks or pebbles as a filter to capture potting mix and prevent it from spilling.
- Place the Flower Window Box self-watering reservoir on top of the filtration layer (fabric or rocks).
- Add potting mix to your planter box, filling it up to 1-2 inches from the top.
- Finally, add your choice of flowers, plants, herbs, or seeds to create a stunning display.
Remember to water your planter box regularly, saturating the potting mix and refilling the reservoir system as needed. Monitor the watering requirements of your plants during the first couple of weeks.
Now that you have the knowledge to install hanging planter boxes and rail top planters, you can transform your outdoor space into a lush and inviting oasis. Enjoy the process and let your creativity flourish!
For more information and a wide selection of planter boxes, visit Ames Farm Center.